21Pressure & Squeeze Gauge — How Coiled Is the Spring
VaultSingle-market view
Nav → Advanced → Pressure & Squeeze Gauge
№ MAP PINS — the gold markers on this screenshot point at locations on the panel; each is explained in the legend beside it. (They are separate from the teal STEP numbers in Part 1.)
1
2
3
4
5
6
7
8
9
10
11
12
What it is
Every other panel tells you where positioning sits. This one measures the tension stored between the two sides — how coiled the Commercials-versus-specialists spring has become. It is explicitly not a positioning read and not a price prediction: it's a structural-tension detector, built on the observation that when a crowded specialist position and a heavy Commercial position stretch apart while participation grows, the eventual resolution tends to be fast.
What it measures
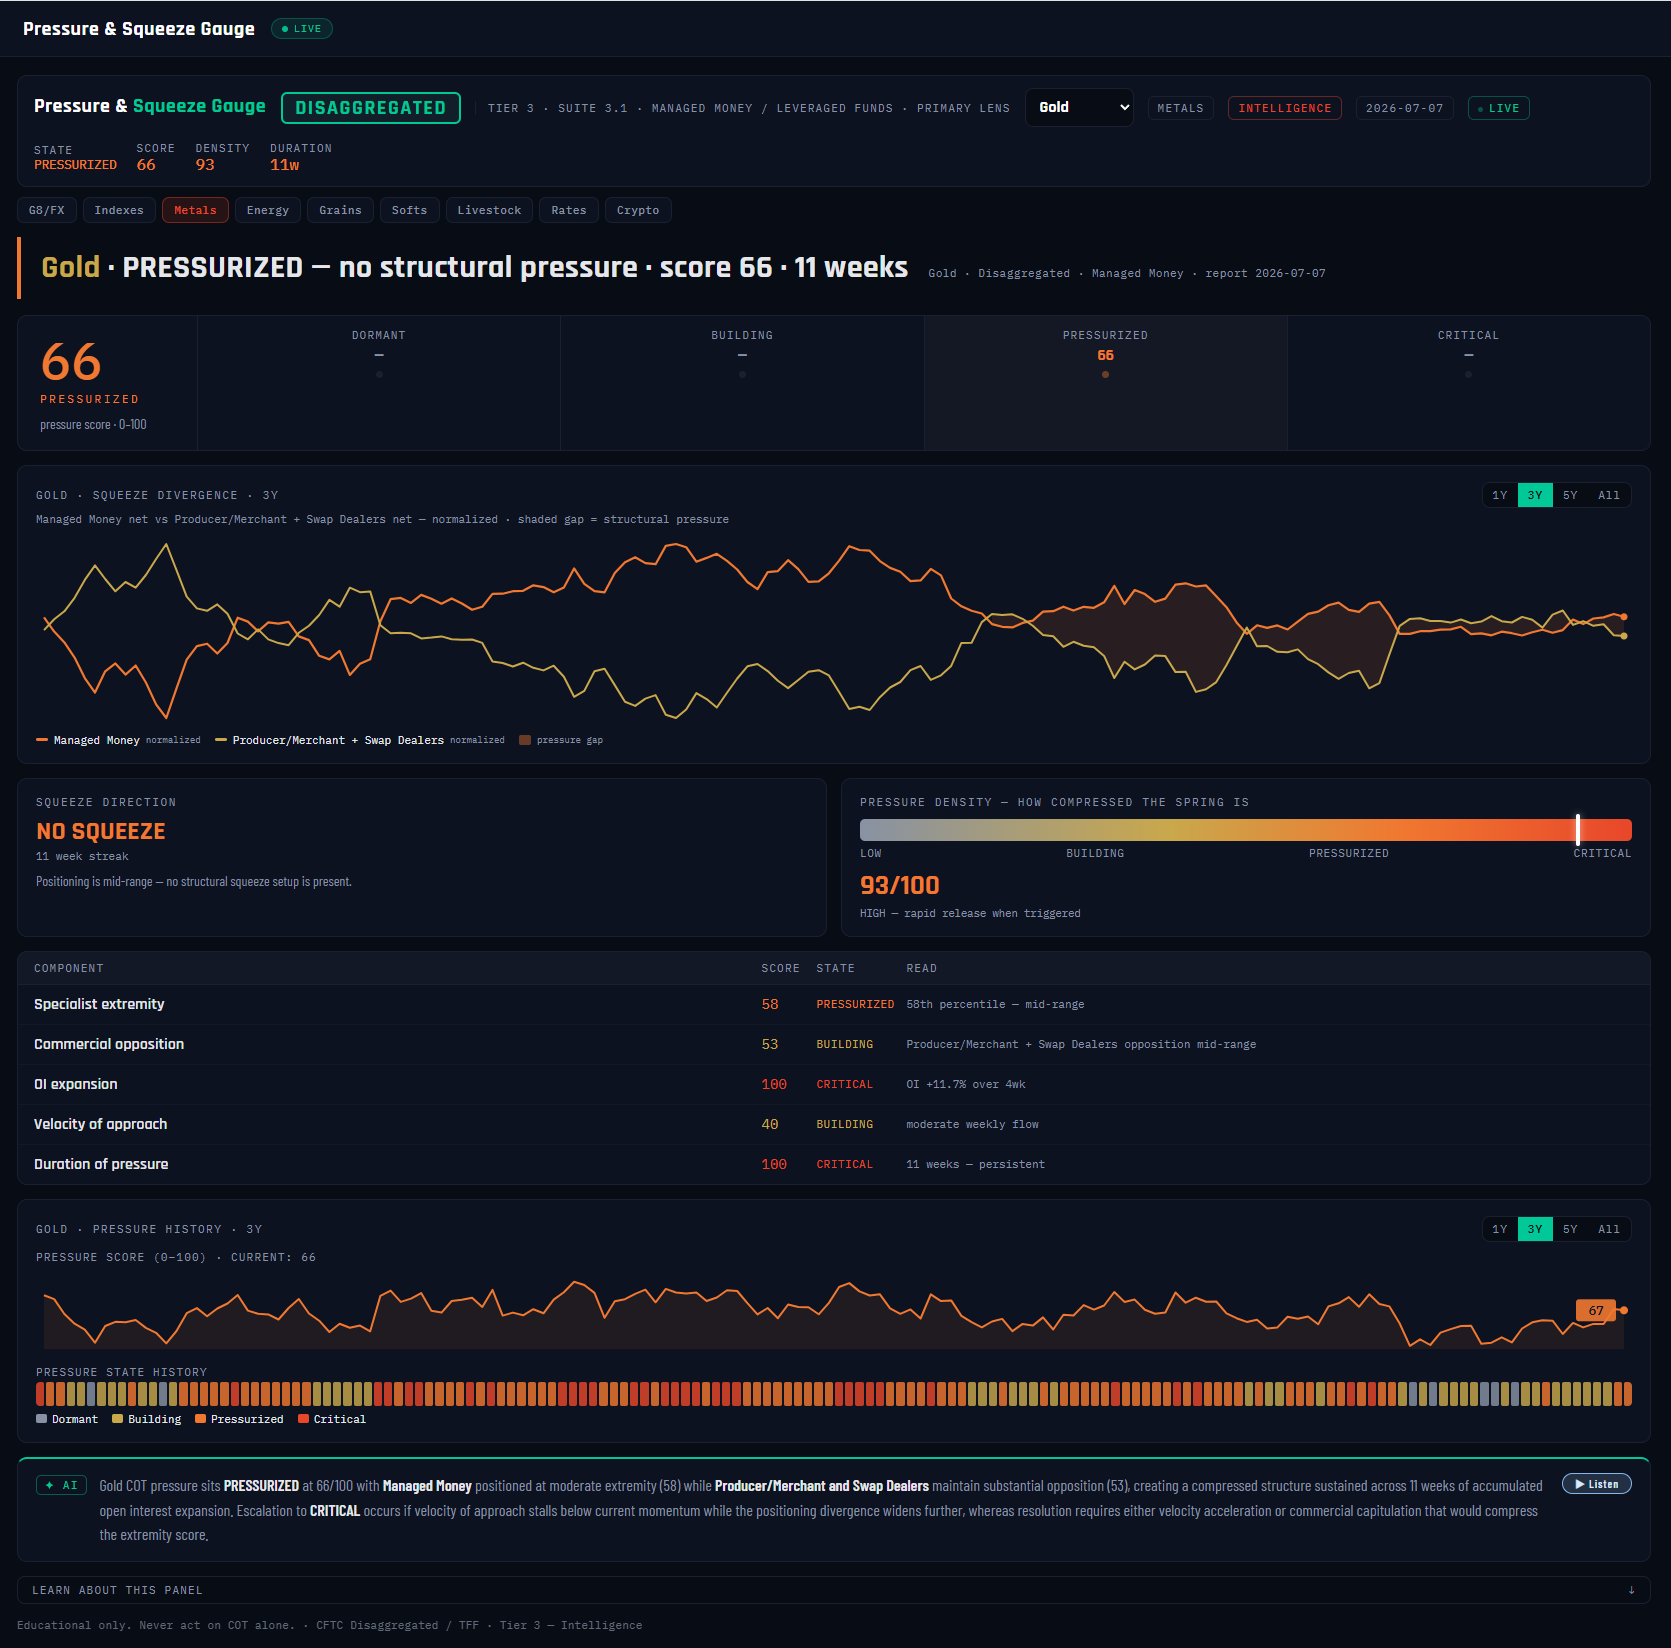
Five components, weighted into one 0–100 pressure score: specialist extremity (30%) — where the crowd's index sits in its range; Commercial opposition (25%) — how heavily the hedging side leans against them; OI expansion (20%) — whether new money is inflating the standoff; velocity of approach (15%) — how fast the crowd is still piling in; and duration (10%) — how long the pressure has persisted. The score maps to four states: DORMANT (below 30) → BUILDING (30–54) → PRESSURIZED (55–79) → CRITICAL (80+). Gold reads PRESSURIZED at 66, eleven weeks in — driven by two components maxed at 100 (OI expansion and duration) — yet the squeeze direction reads NO SQUEEZE, because Managed Money sits mid-range at 58: a squeeze needs a crowded side (index 65+ for a long squeeze, 35 or below for a short squeeze), and Gold doesn't have one yet. Pressure without a trapped crowd is tension without a victim.
Why it's useful to you
Because the pressure score answers the question the COT Index can't: not "is positioning stretched?" but "is the spring loaded?" An extreme can sit inert for months; pressure that's high and dense historically precedes fast moves. Gold's density of 93 means the pressure built rapidly — and pressure that builds fast tends to release fast when triggered. Treat CRITICAL as "conditions present," never as a timing call: the gauge tells you a fast move is structurally possible, your chart tells you when.
The 10-second read
State first, direction second: PRESSURIZED/CRITICAL + a named LONG or SHORT SQUEEZE = a loaded spring with an identified victim. High density = the release will be rapid. NO SQUEEZE = tension, but no crowded side yet.
Use it with: Unwind Tracker (this panel arms it — the unwind, not the extreme, is the tradable event) ·
Pattern Library (The Snap fires when Critical pressure releases) ·
Edge Lab (the squeeze signal's historical hit rate, graded honestly)
1
Panel title. Pressure & Squeeze Gauge · Tier 3 · Suite 3.1, on the Disaggregated report: Managed Money as the specialist crowd versus Producer/Merchant + Swap Dealers as the Commercial side.
2
State chips. STATE PRESSURIZED · SCORE 66 · DENSITY 93 · DURATION 11w — the full verdict in four numbers.
3
Verdict banner. "PRESSURIZED — no structural pressure · score 66 · 11 weeks." State plus squeeze direction in one line — for Gold, tension is elevated but no side is crowded enough to squeeze.
4
Pressure score readout. The composite 0–100 number: 66. This is the level all four states are cut from.
5
State ladder. DORMANT → BUILDING → PRESSURIZED (66) → CRITICAL. Gold sits on the third rung; 80 is the line where the spring counts as fully compressed.
6
Squeeze divergence chart. Managed Money net and the Commercial net, normalized onto one scale — the shaded gap between them IS the pressure. Watching that gap widen is watching the spring compress in real time.
7
SQUEEZE DIRECTION card. Reads NO SQUEEZE (11-week streak): the specialist index (58) is mid-range, so neither a long wash-out nor a short covering rally is structurally set up — despite the elevated score.
8
PRESSURE DENSITY meter. 93/100 — HIGH. Density gauges how rapidly the pressure accumulated; dense pressure historically releases fast when a trigger arrives ("rapid release when triggered").
9
Component table. The five inputs with Gold's readings: specialist extremity 58, Commercial opposition 53, OI expansion 100 — CRITICAL, velocity 40, duration 100 — CRITICAL. The score is mid-scale because the two extremity components are mid-range — the table shows you exactly why.
10
Pressure score history. The composite score over 3 years (66 now). Prior peaks mark the market's past squeeze setups — useful calibration for what "high" means in this market.
11
Pressure state strip. One colored bar per week — the market's tension history at a glance, and the same state series the Unwind Tracker uses as its trigger condition.
12
AI analysis + Listen. Two sentences: the state and its main drivers, then the escalation watch — for Gold's Pressurized read: if velocity stalls while the divergence gap widens, the state escalates to Critical.